Monday, 19 March 2012

Steam Powered Giraffe

 
This little guy is a stuffed toy that I made to send to my sister who is away at university!  About two weeks ago, I discovered an amazing band called Steam Powered Giraffe - here's one of their songs.  Watching and listening will describe the band far better than I'd be able to with words.
 Steam Powered Giraffe, Brass Goggles

She's listened to a couple of their songs, and also loves them!  And before she left for college, she said that I should make things and send them to her - however, I don't think this is quite what she meant!

The giraffe is made from this free PDF pattern that I found after a quick Google, and some quilting cotton that I found at Spotlight that looks vaguely like gears (for the steam powered bit of the name!).  His eyes are little gold beads that we have had in our sewing box forever, and his tail is made from three pieces of 6 strand embroidery cotton, each about 20cm long, then doubled over and plaited, secured with a knot.  I added a little chocolate brown bow round his neck as an afterthought, and this can be removed if she decides she doesn't like it.
 Steam Powered Giraffe, Honeybee


Anyway, this was just a quick little project for fun, and I hope she likes it!

PS: I highly recommend watching and listening to their videos, this band is seriously amazing!  Even if you are one of those people who say they're 'not into steampunk', you don't have to know or enjoy anything about the genre to like this music.

Tuesday, 21 February 2012

Leibster blog award

I have been given a blog award (my first one!) by Splatastic! Thanks so much, I feel quite honoured to have been awarded this award!


"The origins of the Liebster Blog Award are somewhat unclear but the general consensus is that it means favourite or dearest to showcase bloggers with fewer than 200 followers."

And it comes with the following ‘rules’:

1 - thank your liebster blog award presenter on your blog.
2 - link back to the blogger who presented the award to you.
3 - copy/paste the blog award on your blog.
4 - present the liebster blog award to 5 blogs (with 200 followers or less).
5 - let them know they have been chosen by leaving a comment.

I've had a flick through my subscribed list and picked out five lovely ladies to award this to (in no particular order aside from the order my tabs are open in!)

  • Lady Danbury/Thinking In Shapes: I love seeing all her wonderful creations, she has the sort of wardrobe I can only dream of having!
  • Reana at Curves, Patterns, and Pins: A fellow Queenslander who started sewing at about the same time as me (but has advanced much more quickly, and has an impressive collection of self-made, refashioned, and mended clothes).  My favourite bit of her blog is the Check The Technique challenge/list that she's doing at the moment - a list of techniques that she's aiming to learn how to use.  I'd love to sit down and write one of them for myself
  • Meg at Meg The Grand: This fabulous lady's blog is so full of joy, I can't help but smile (and sometimes laugh out loud - especially at the post her boyfriend guest-authored!) whenever I visit her page
  • Lisa at Notes From A Mad Housewife: she makes some super cute clothes for her kids, as well as beautiful creations for herself - my current favourite is her denim and white Colette Macaron, with bright red lining
  • Kat at Petticoats & Peplums: I've only just started following her blog, and I'm loving seeing what she has been up to!  I especially like all the wedding posts that she did a little while ago, but also seeing all the sewing, decorating, and cooking stuff that is happening at her place.  Added bonus: ANOTHER Queenslander - I seem to be collecting Aussies on my blog roll without realising it!

Thursday, 9 February 2012

My Strawberry, Style Print, Sew Grateful dress

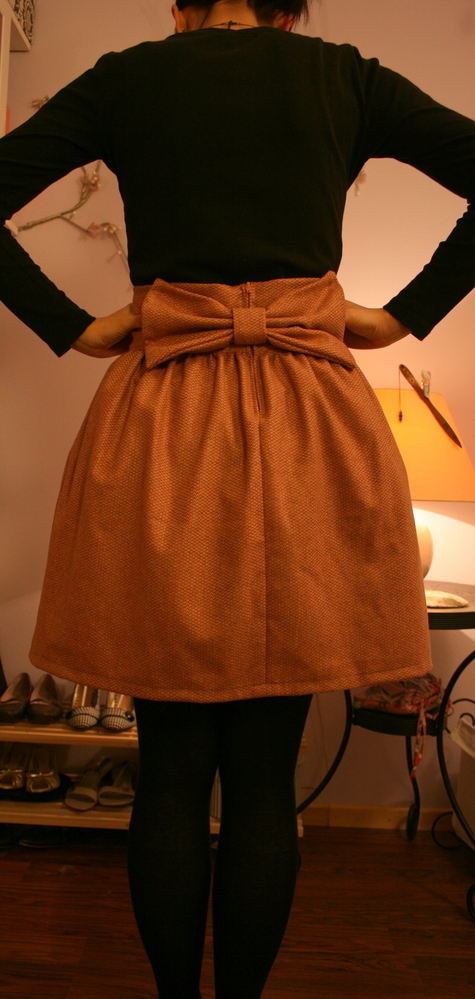
So, after a lot of build-up on my blog, here is the finished product!  I am so happy with how it turned out, and with my first go at making a belt and belt loops.  Although some of the eyelets are a bit wonky, it does the job and looks absolutely lovely.

The pattern that I used, as you are all probably sick of hearing by now, is Style Print 1283, which I won in a giveaway from Debi over at My Happy Sewing Place - also the host of the Sew Grateful week!


(Just like the pattern cover... except not!)

As you can see, I made view A, with the full skirt and short sleeves.  I also added four belt loops (just a 1 inch strip of material folded into quarters lengthways and stitched down... probably not the best way to do it but it works!) attached at the bottom of the waist darts on the front and back, to make sure they were evenly spaced.  Next time I decide that I want to attach belt loops onto a dress with a full skirt, remind me how INCREDIBLY NOT FUN it is!

I had a lot of fun making this dress, and learned a lot!  It was the first time I've done anything with a collar, which came together a lot more easily than I was expecting.  I had a play with more flat-felled seams, and used them on the shoulder seams, the seams closing the bottom of the sleeves (not sure what these are called), and then decided that I wanted to put them on the arm-hole seams as well!  So that was incredibly fiddly, but I think it worked out well - and now it looks so beautiful on the inside!

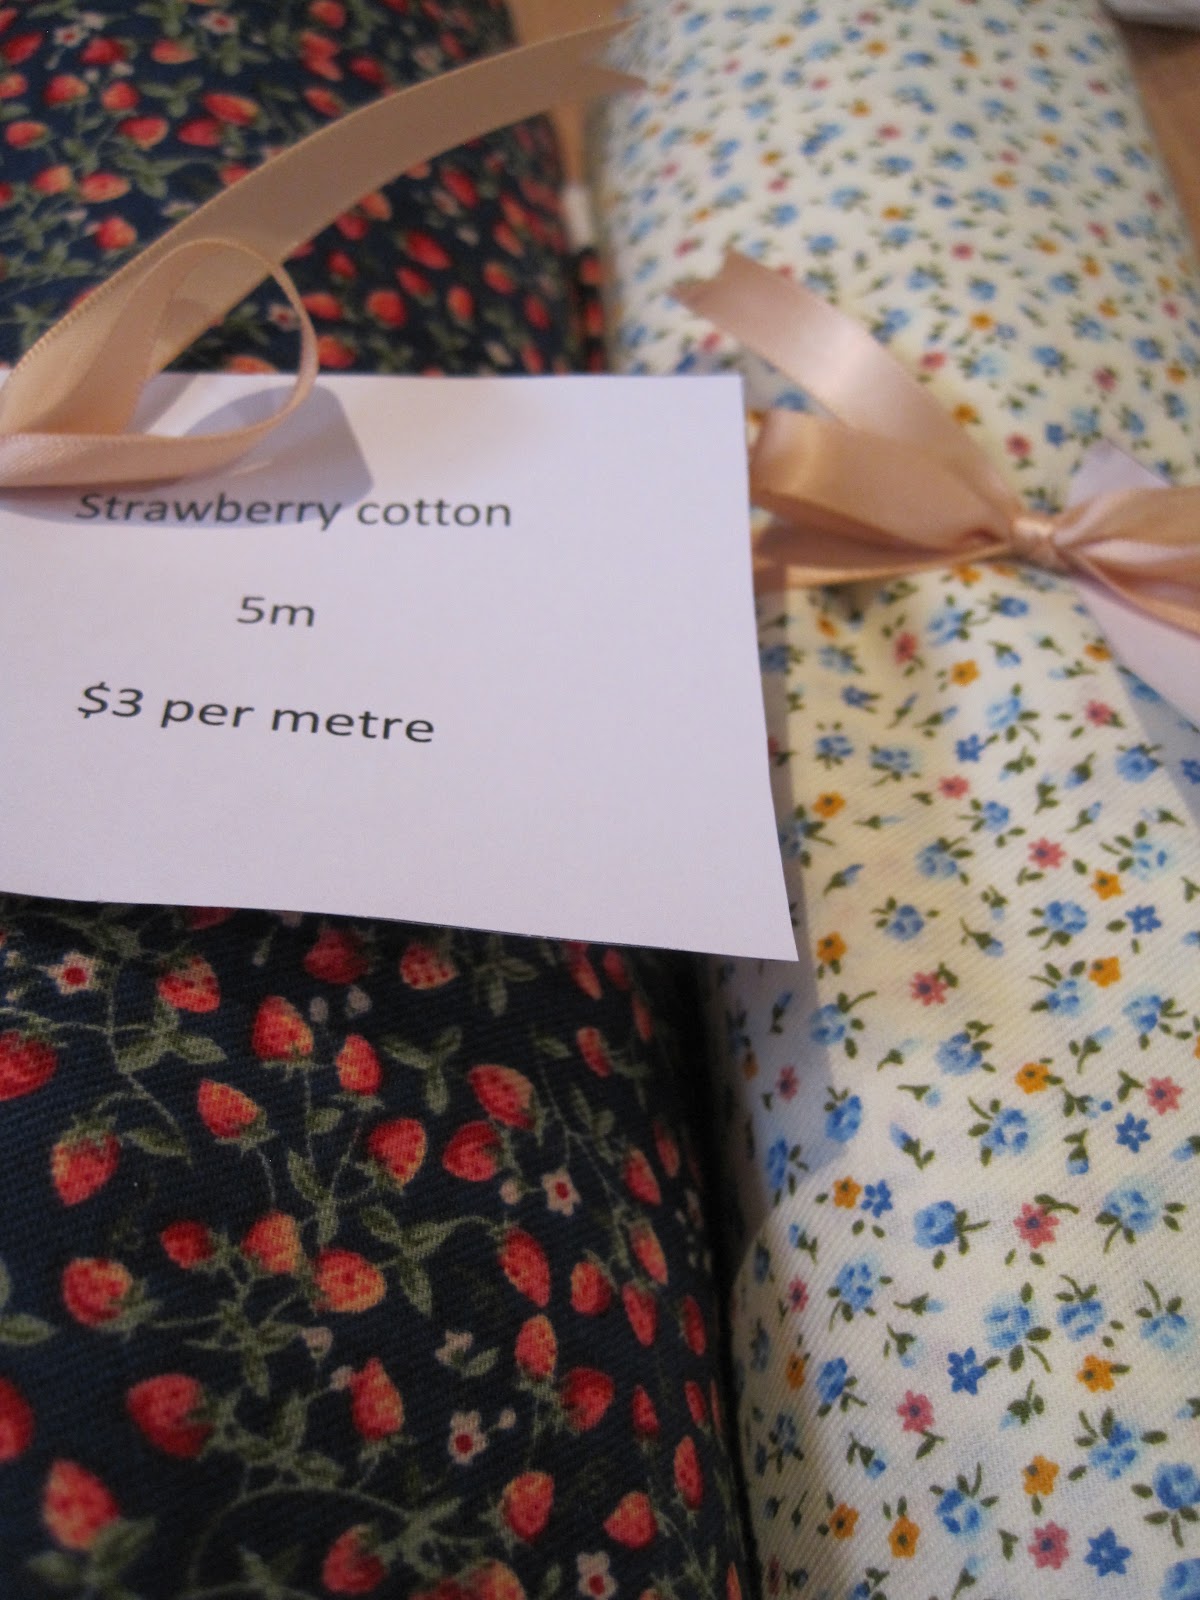
In other news, I found out that the machine I have been using has a blind hemming foot, so I used that to do them hem of the skirt and the sleeve hems, and it looks lovely - except for where the machine decided that it would be a good idea to take a navy blue stitch straight through the centre of a red strawberry.  But I think I am the only one that will be looking that closely at the hemming, so it doesn't particularly matter, not that there's much I can do about it aside from hemming all 3m of the skirt by hand.

In regards to the skirt, I took 3 inches off before cutting the material, and then an extra half inch again (in addition to the 2 inch hem that the pattern called for) to take this skirt to a mid-knee level.  I think if I was to make this  again, I might take a further half inch or inch off, just so it's a tiny bit shorter.

I also rearranged the buttonholes slightly to accommodate 3 buttons, the same as Debi did in her versions (view A with full skirt, view B with straight skirt), rather than the two that the pattern called for - I get a bit paranoid about the gaps between buttons gaping unflatteringly, which has happened to me with a couple of my work blouses!

(I painted my nails navy blue for this week, and when I messed up one of my ring finger nails, I decided to try to use my feeble art skills to paint a strawberry - do you think it was a success?  Also, my sister the photographer says it's very hard to take close up photos with some sort of light in summer - the sun's either overhead or set!)

I didn't make any other adjustments to the fit of this one.  Because of the era that this pattern is from, the bust darts do give a bit of a 'pointy-boob' look, designed to be worn with a bullet bra.  However I didn't feel confident enough to mess around with the darts, so I just left it.  The slight looseness of the bodice combined with the busy print means that the slightly odd fit around the bust isn't particularly noticeable.

Overall, this was a lovely lovely pattern to work with, and I'm so glad I got to make this dress!  My sister is currently working on a version of her own, so hopefully that'll appear on here at some point in the future.  Debi, thank you so much for sending me this!  I'll try to find it a lovely new home when the time comes - maybe next Sew Grateful week! :)

Fun photos to finish - this dress is very good for spinning in!  Also, the dogs like to 'help' with photos, mostly by putting white hair all over my dress and bringing my spitty, muddy tennis balls to throw.

Thanks x 1000 go to my sister, for taking photos of me in the exotic location of the back veranda, on the first sunny day all week!

Sunday, 29 January 2012

Clothing labels

When I was messing around on Pinterest, I found this tutorial for making your own labels to go inside your handmade clothes.  And I would really like to give it a go!

My only problem is, I'm not very good at making decisions, so I'm turning to my readers for some input - which one of the following do you prefer?  They would be printed onto iron on t-shirt transfer paper, and attached to grosgrain ribbon, probably white or cream.


I think at this stage, I prefer the first loveheart, although the bird and the moustache are also serious contenders!  Unless I make up 3 sets...

I'll end this self-indulgent post with some news - I have finished my strawberry dress, and I'll be showcasing it on my blog during Debi's second Sew Grateful week, the 6th to 12th of February.  All that I need to do now is wait for a non-rainy day (at this time of the year, a Nice Day is a bit too much to ask for - even if there is no rain, there'll still be very high humidity) so that my sister can help me take some photos!

Sunday, 1 January 2012

Fabric rolls and sewing plans


 Look at my happy fabric, all rolled, labelled, and tied with a bow!
My copy of the Collette Patterns Sewing Handbook came yesterday, and this was one of the tips she included in it.  This fabric was previously sitting in a bag, folded and flat, and slipping everywhere while unfolding itself.  Now it's all bundled up, sits still, and I know how much I have of the fabric!
Plus, it's super pretty with the gold bows with notched ends!


The strawberry printed cotton in the left of this photo is destined to be view A with short sleeves of this StylePrint dress pattern that I won in a giveaway from Debi.  I've also got a beltmaking kit on the way from A Fashionable Stitch, so I'm going to do bright red buttons and a red belt to go with this dress.
I haven't quite worked out what I'm going to do with the daisy printed fabric yet - it's cream, with blue, pink, and yellow flowers on it.  Any suggestions would be welcome.  My last thoughts were a pajama set with mid-thigh length shorts and a top with a shirred back - one of the techniques I've been wanting to try out.  But I already have too many pjs, so maybe not.  So this may be one that sits there for a little while and waits for inspiration to strike, unless you have any suggestions?  I have 3m of it, so there's a fair bit there!

These two beautiful satins are for my choir dress.  The peacock coloured one didn't photograph very well, it is actually a whole lot more green than this.  In any case, the rolling was DEFINITELY a good idea for these two, the main culprits of the slipping and sliding around!
I'm hoping to get this stitched up by the end of January (which may or may not end up happening!), and I'll be cutting it out as soon as I get back from my trip.  I'm excited to start on the good version of this dress, I really hope it turns out!

In any case, that's what I have planned for the next little while.  Before I go back to uni, I also want to try out a shorts pattern and try sewing with jersey/knits - two things that I have never done before.  I have the patterns already, but I'm not going to buy the material until AFTER my current projects are finished, otherwise none of them will get done!

Saturday, 31 December 2011

Tulip skirt part 1

When I was getting fabric for an unrelated project, I was called to the most beautiful fabric that I have ever seen - a cotton voile with blue and purple tulips.  So, because I have no self control, I bought some, along with some plain white cotton for underlining/lining (what do you call it when the lining fabric is included in the pleats at the top with the main fabric, but is hanging free for the rest of the skirt?)
It was a very wide piece (not quite 150cm, but nearly!), and I got 1.5 m of the fabric

I ended up making a skirt that was a cross between the Ooobop! floral mini (tutorial here) and Nette's Go Parisienne skirt.

(Left: floral mini.  Right: Go Parisienne skirt)


Sashes on skirts annoy me because they dig into my back and I can never make them sit right (so I suspect user error rather than a fault with the sash itself!), so I used the floral mini tutorial for the main skirt and then the bow that Nette used at the back of hers to add something special to the back.


I made this skirt a bit longer than was suggested in the original (40cm from the bottom of the waistband to the hem, instead of 32cm) so I can wear it to work, and also made the waistband a bit wider - mine was 13cm when I cut it, so the actual band on the finished skirt is 5cm wide instead of 3cm finished width as suggested.  The waistband circumference was 72cm, and I have decided that next time I make this I'll make it sit on my waist instead of somewhere between my waist and hips!  I also didn't use interfacing in the waistband because of the stiffer fabric I used as an under layer.

To make the pleats, I marked every 2 inches along the top and made a box pleat in the centre front (or two knife pleats butted up against each other facing different ways, if you like!) and then knife pleats all the way around.  It sounds very bizarre when I'm explaining it, but it worked!

I had a lot of dramas installing an invisible zipper in this skirt- here is my first attempt at it. 

Even though I was positive I was doing it properly, and used the foot correctly and everything, it's not very invisible at all!

Two more tries and three broken needles later, I gave up and just installed it like a regular zipper.  I'm not sure what the technique is called, but you end up with two little flaps covering the zipper teeth - it's the method that they use in all of the Butterick patterns.

The side seams on the tulip fabric and the cotton are French seamed, and the centre back seam is done with a technique that I made up myself (because I was stuck, haha) - basically a baby hem at the seam allowances, and then treated the new edge as the raw edge when I was sewing it together.  So I now have another item of clothing to add to my 'no raw edges' collection - a slight obsession of mine at the moment!

Unfortunately I don't have any photos of it on me, I'm waiting for my sister's good camera be able to talk to the computer again so I can coerce her into taking some for me!

So here are a couple of photos of it on my oddly-shaped dressmaker's dummy, a little crumpled from being squished in my wardrobe, but still beautiful!


Sunday, 11 December 2011

Bodice draft 2

Disclaimer: this post contains a goofy half-smile, black bra underneath cream fabric, and black strapping tape - if you are shocked by any of the above silly looks, please stay away!  Haha.

Here we go - I'm much much happier with the fit of this one.  I raised the neckline 1.5 inches, lowered the point of the bust darts by about 1.25 inches, adjusted the bust darts so that instead of straight legs they have bent legs (like in this tutorial by Gertie at Gertie's New Blog for Better Sewing), let out 0.5 cm from either side of the bust darts... and I think that's about it!  The darts weren't done in the highly mathematical way as described in the tutorial - I tried doing it like that and still couldn't get it quite right, so I just pinched off the fabric into a good shape for my body and it turned into that shape so I went with it!


The end of the darts looks not quite right in this picture but I've since pressed and re-pressed and re-re-pressed them, and it's finally sitting properly.

In regard to my gapey back problem, I took about 1.5cm (I think?) off either side of the centre back seam, tapering down to the original seam allowance just above where the waist darts end, and I think that's just about fixed the problem without completely restricting my movement.


In other exciting news, I have acquired the fabric - it's a satin charmeuse, from Spotlight, and it's lovely!  Plus, it was on sale for about $6.50 a metre instead of $12.99, which is brilliant considering how much I need - 4m of black and 4m of teal/peacock.  Hopefully I've done all my calculations correctly and I don't need to go back and get more! 

As before, any input on the fit of the bodice would be much appreciated, before I cut into my main fabric, hopefully sometime this week.